Pinterest can be an amazing source of traffic for your website and can bring you leads and sales for your business. If you’re ready to start using Pinterest for business, the first thing you’ll need to do is create a new business account. A business account allows you to claim your account, create pins, and iew your analytics. You can read more about the benefits of claiming your website at the Pinterest help desk. There are a couple ways to get started. You can create a brand new business account, or if you’re already using it, you can convert a personal Pinterest account to a business account.
In this tutorial, I take you step-by-step to convert a personal Pinterest account to a business account.
Pin it for later!

Convert Your Personal Account to a Business Account
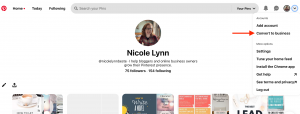
First, click on your profile picture to get a drop down menu. Click on ‘Convert to business’.
Second, there will be a chart comparing a personal account to a business account, listing all the benefits you’ll get with a business account. As you can see, you gain a lot when converting to a business account. Click the red ‘Convert account’ on the right.

Optimize Your Profile
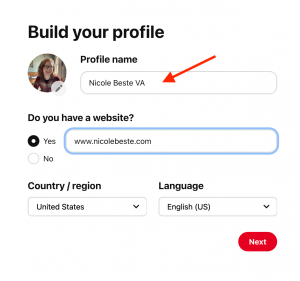
Third, you’ll start to keyword-optimize your account when you build your account. Your profile name should contain your name and/or business name, and the niche-specific keyword you want to rank for. Keep in mind, Pinterest users are not looking for you, they are using it as a discovery platform, therefore it’s important to use keywords that people are searching for in your name.
Add your website and location (this is important if you have a local business).
Note: This does not claim your website, that step will be later.
If you aren’t already using the same profile picture or logo that you use across other social media platforms, now is the time to change it. Generally, people like doing business with people, but if you want to use your business logo, that’s okay too.
Next, you can change your username. This can be the same as your other social media profiles. Your bio is another place you should put keywords. Write a sentence or two about what you do and who you do it for. Include keywords and your website. If you’re a local business owner, mention your location here.

Describe Your Business
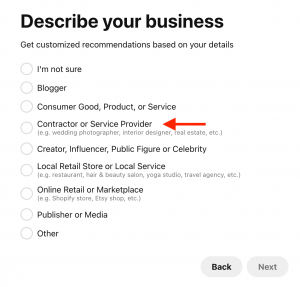
Then, Pinterest will ask a few questions to know your business better, including what your business is and what your goals are. You can have up to three. For example, as a service provider, I checked the boxes to increase website traffic and generate leads to my business. If you aren’t sure yet, that’s okay, you can change this later.

Pinterest will also ask if you want to run ads. You can change this later if you are undecided.

Pin it for later!

Claim Your Account
Last, claim your account. This is important! And don’t worry, it won’t be too technical. If you don’t already have Yoast SEO, log into the backend of your website and go to the Plugins to add new, and download Yoast SEO.
Back on your Pinterest account, click ‘Claim’, which is on the left hand menu. Then click ‘Claim’ next to Website.

A box will pop up to choose how you want to claim your site. Click the HTML Tag, which will automatically copy it.

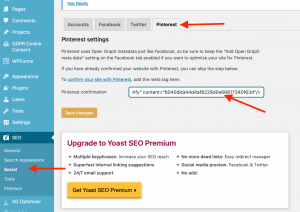
Then click over to your website and go to the Social tab under SEO. Next, click on the Pinterest tab on the right, and then paste the HTML tag into the bar, and click Save Changes.
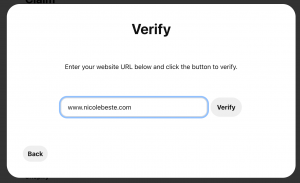
Finally, toggle back over to Pinterst and paste your website URL in the bar. Then click ‘Verify’.
That’s it! You’ve successfully converted your personal Pinterest account to a business account! Now you can create pins that lead to your content and review analytics.